Search This Blog

Showing posts with label Ubuntu. Show all posts

Saturday, March 28, 2009

How to scrape emails for online marketing? -- for free

Prologue - Is harmless marketing always Spam?


spam

Ok, so I had started a website and wanted to promote it. At some point, you might be in the same boat too.

Unfortunately, I did not have a while lot of contacts for sending emails to. Well, the website was not really spammy (it was actually a community related website for open source audio resources), and I was not going to solicit for money, so I did not have a lot of compunctions in telling people about it. If they wanted to listen to some audios, they could stick around, otherwise they could do anything else they pleased to.

I knew some owners of yahoo groups that had heavy audience. I thought maybe it was worth a shot explaining about the website and asking if they might be willing to share emails for targeted promotion. The results were quite disappointing, and somewhat expected.
After talking to a few of them, my general observation seemed that most group owners think that as long as they dont give out member emails to others, those emails would always be protected from spam. They tend to think of other groups/email distributions as spam! (as if those people WONT get any other SPAM in the future at all, huh?)

Whatever, I thought. As long as my intentions were pure, I did not need to have second thoughts.

So what are my options?


q-man-thinking-21

Hmph! What a Bummer. How long could I depend on google to make the website more popular? It was basically a deadlock.

So one fine day, I started thinking about how ELSE I could approach this problem. For example, could I not use a unix utility like wget or perl to simulate web clicks or use some robot utility to do clicks, web navigation and download information?

Then another thought was -- could I not get emailids from specific yahoo groups or gmail groups that I was subscribed to, and whose target audience might be interested in knowing about a website? After further digging on google, I found that there IS a perl module called WWW::Yahoo::Groups that can programmatically fetch group messages to local PC drive.

WWW::Yahoo::Groups -- Easier said than done..


I tried installing WWW::Yahoo::Groups on a unix box I had access to, but it seems that its easier said than done. It had a ton of dependent modules that wouln't install properly (even with the force option) -- I specifically had a lot of trouble with the Crypt::SSLeay module.

So what next?


This failure forced me to look for other options. And boy, there are quite a few of them available. fetchyahoo is one, then you have yahoo2mbox.
Now, An interesting point about yahoo2mbox is that there are a couple places where you can find it. Apparently, TT solutions has their own version at http://www.tt-solutions.com/en/Products/yahoo2mbox, while there is a debian version available at http://packages.debian.org/lenny/yahoo2mbox. I had problems with the debian version on Ubuntu and tried using the one from tt-solutions, which worked better.

So while fetchyahoo can fetch the contents of a single yahoo user, yahoo2mbox can do the same for a yahoogroup.

Fine, I thought, lets go for the jugular and get yahoo2mbox to work. The results were inconsistent: if you are a moderator of the group or if the group has really loose security setting for not masking email ids, only then can you see the email ids in the downloaded messages. Also, you get weird messages/errors if the group home page has photo and text (got some tag related errors with a yahoo group FHRS_USA).

Email masking on Yahoogroups and Google groups..


Anyway, I realized that both yahoogroups and google groups had elaborate email masking on. True, without it, the online world would NOT be a safe place to be in. Email harvesters would retrieve emails left, right and center and make big bucks.

This is an example from yahoo groups content fetched through yahoo2mbox:

...

...
From devendra999@8_ZAVFsOGj8FjcpG8_oA372HgMSEAl6ol8NKeUSx7VKOtZW8QZCRKJGqiqzqMU-GwjIpYZBzGXe2JmZrjCeniA.yahoo.invalid Sat Aug 05 14:41:35 2000
Return-Path: <devendra999@8_ZAVFsOGj8FjcpG8_oA372HgMSEAl6ol8NKeUSx7VKOtZW8QZCRKJGqiqzqMU-GwjIpYZBzGXe2JmZrjCeniA.yahoo.invalid>
Received: (qmail 6062 invoked from network); 5 Aug 2000 21:41:35 -0000

...

...

This is an example of detailed header fetched using a similar utility called gmail2mbox.pl:
Received: by 10.90.81.11 with SMTP id e11mr6036070agb.27.1237961013457;
Tue, 24 Mar 2009 23:03:33 -0700 (PDT)
Return-Path: <raviraj.pe...@gmail.com>
Received: from mail-gx0-f164.google.com (mail-gx0-f164.google.com [209.85.217.164])
by gmr-mx.google.com with ESMTP id 15si1362316gxk.4.2009.03.24.23.03.32;
Tue, 24 Mar 2009 23:03:32 -0700 (PDT)

Again, what are my options?


So a couple days into the quest and no clear solution yet. Water, water everywhere and not a drop to drink. What an irony.

With these thoughts in mind, I was looking at individual emails (of the yahoo group that I was interested in) in my Yahoo! inbox. Quite absent mindedly, I opened one of the messages a view source and realized that it did not have email masking turned on. In fact, I realized, it could be on, because what would the reply-to address be then? In other words, the From Email id HAD to be available in the mail header of yahoo group email in my inbox.

Aha!


aha_moment

So then, the solution was plain and simple. I would extract the individual email messages for a yahoo group and then extract the email ids from there. Theoritically, it should work. In practice too, it did. Here is an example:
From v_ramesh00001@yahoo.com Thu Feb 10 16:59:16 2005
Return-Path: <v_ramesh00001@yahoo.com>
X-Sender: v_ramesh00001@yahoo.com
X-Apparently-To: sewausa_atl@yahoogroups.com
Received: (qmail 45652 invoked from network); 11 Feb 2005 00:59:15 -0000

So this meant that one would just need to be part of email distribution of a particular yahoo group that one is interested in. It is easier to extract emails if all yahoo group related emails are filtered into a specific folder (then you can utilize --folder option of fetchyahoo).

The quirks of making 'fetchyahoo' work..


For using perl, there are a couple options available, but the best option, in my humble opinion, seems to be Active Perl on windows, available at http://www.activestate.com/activeperl/ . The "other" options on windows are Cygwin or Virtualbox to simulate a unix environment in windows.

If you want to use Virtualbox, the easiest option is to install Ubuntu. You can find a lot of Virtualbox How to articles here. Another option is http://wubi-installer.org. Look at http://www.technobuzz.net/how-to-install-ubuntu-in-windows-with-wubi/

While Cygwin mostly works for simple unix stuff, I found that most of the perl package dependencies do not work out and you end up getting frustrated (I found that Crypt::SSLeay module had problems).

Installing ActivePerl and required modules for fetchyahoo


So activeperl .msi is installed, the perl executable is automatically aded to the windows PATH:
c:\emails\fetchyahoo-2.13.3>perl -version

This is perl, v5.10.0 built for MSWin32-x86-multi-thread
(with 5 registered patches, see perl -V for more detail)
..
..

Also, we will assume that the latest version of fetchyahoo is downloaded and extracted to c:\emails\fetchyahoo-2.13.3 folder:
c:\emails\fetchyahoo-2.13.3>dir
Volume in drive C has no label.
Volume Serial Number is DA07-A231

Directory of c:\emails\fetchyahoo-2.13.3

03/27/2009 09:48 PM <DIR> .
03/27/2009 09:48 PM <DIR> ..
03/09/2009 12:09 PM 15,182 ChangeLog
03/09/2009 12:09 PM 17,992 COPYING
03/09/2009 12:09 PM 2,747 Credits
03/09/2009 12:09 PM 107,289 fetchyahoo
03/09/2009 12:09 PM 5,359 fetchyahoo.1
03/09/2009 12:09 PM 2,287 fetchyahoo.spec
03/09/2009 12:09 PM 4,907 fetchyahoorc
03/09/2009 12:09 PM 6,314 index.html
03/09/2009 12:09 PM 19,380 INSTALL
03/09/2009 12:09 PM 966 TODO
10 File(s) 182,423 bytes
2 Dir(s) 147,889,139,712 bytes free

You should now try to run it. it gave me this error initially:
c:\emails\fetchyahoo-2.13.3>perl fetchyahoo
Can't locate MIME/Head.pm in @INC (@INC contains: C:/Perl/site/lib C:/Perl/lib .
) at fetchyahoo line 59.
BEGIN failed--compilation aborted at fetchyahoo line 59.

Basically, it needs the MIME::Head module installed. For this, we will use CPAN module. You can also use the CPANPLUS module, which is more advanced and has the option of un-installing PERL modules too. CPAN module cannot un-install modules.

This is how you invoke CPAN (you can also just type c:/> cpan). Note that the overwriting the lockfile message might come if a previous session did not terminate properly:
c:\emails\fetchyahoo-2.13.3>perl -MCPAN -e shell

There seems to be running another CPAN process (pid 5220). Contacting...
Other job not responding. Shall I overwrite the lockfile 'C:\Perl\cpan\.lock'? (
Y/n) [y]

cpan shell -- CPAN exploration and modules installation (v1.9205)
ReadLine support enabled

cpan> install MIME::Head

Going to read C:\Perl\cpan\Metadata
Database was generated on Thu, 26 Mar 2009 10:26:54 GMT
Running install for module 'MIME::Head'
Running make for D/DO/DONEILL/MIME-tools-5.427.tar.gz
Fetching with LWP:
http://ppm.activestate.com/CPAN/authors/id/D/DO/DONEILL/MIME-tools-5.427.tar.g
z
Fetching with LWP:
http://ppm.activestate.com/CPAN/authors/id/D/DO/DONEILL/CHECKSUMS
Checksum for C:\Perl\cpan\sources\authors\id\D\DO\DONEILL\MIME-tools-5.427.tar.g
z ok
Scanning cache C:\Perl/cpan/build for sizes
DONE
MIME-tools-5.427/
MIME-tools-5.427/testin/
MIME-tools-5.427/testin/multi-simple.msg
MIME-tools-5.427/testin/andreas-1296.uu
MIME-tools-5.427/testin/ak-0696.msg
MIME-tools-5.427/testin/short.txt
MIME-tools-5.427/testin/words.txt
..
..
..

CPAN.pm: Going to build D/DO/DONEILL/MIME-tools-5.427.tar.gz

*** Module::AutoInstall version 1.03
*** Checking for Perl dependencies...
[Core Features]
- Test::More ...loaded. (0.72)
- Mail::Header ...missing. (would need 1.01)
- Mail::Internet ...missing. (would need 1.0203)
- Mail::Field ...missing. (would need 1.05)
- MIME::Base64 ...loaded. (3.07_01 >= 2.2)
- IO::File ...loaded. (1.14 >= 1.13)
- IO::Handle ...loaded. (1.27)
- IO::Stringy ...missing. (would need 2.11)
- File::Spec ...loaded. (3.2501 >= 0.6)
- File::Path ...loaded. (2.04 >= 1)
- File::Temp ...loaded. (0.18 >= 0.18)
==> Auto-install the 4 mandatory module(s) from CPAN? [y]
...
...
Appending installation info to C:\Perl\lib/perllocal.pod
GBARR/TimeDate-1.16.tar.gz
nmake install -- OK
Running install for module 'Test::Pod'
Running make for P/PE/PETDANCE/Test-Pod-1.26.tar.gz
Fetching with LWP:
http://ppm.activestate.com/CPAN/authors/id/P/PE/PETDANCE/Test-Pod-1.26.tar.gz
Fetching with LWP:
http://ppm.activestate.com/CPAN/authors/id/P/PE/PETDANCE/CHECKSUMS
Checksum for C:\Perl\cpan\sources\authors\id\P\PE\PETDANCE\Test-Pod-1.26.tar.gz
ok
..
..
t/require.....ok
t/send........ok
All tests successful.
Files=8, Tests=127, 2 wallclock secs ( 0.00 cusr + 0.00 csys = 0.00 CPU)
MARKOV/MailTools-2.04.tar.gz
nmake test -- OK
Running make install
Prepending C:\Perl\cpan\build\MailTools-2.04-fCc9N7/blib/arch C:\Perl\cpan\build
\MailTools-2.04-fCc9N7/blib/lib to PERL5LIB for 'install'
...
...
Module 'MIME::Head' installed successfully

No errors installing all modules

Interestingly, you can also check this using Perl Package Manager GUI Utility (invoked by typing ppm on the windows command prompt). It just takes lot of time to load the GUI's data:
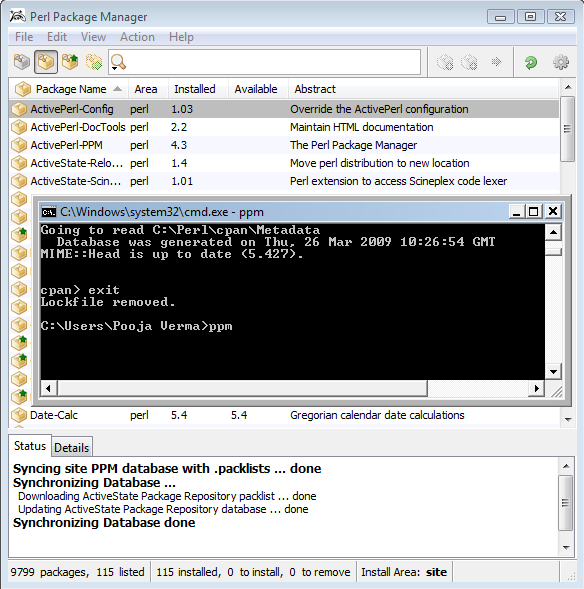
perl-package-manager-screenshot

Now, let us check if it works:
c:\emails\fetchyahoo-2.13.3>perl fetchyahoo --nodownload
No username specified.
Please enter your Yahoo! username: pooja33pandey
Please enter your Yahoo! password:
No mailbox or mailspool specified.
Please enter the path to and name of your mail spool or mailbox (eg /var/spool/m
ail/username): pooja33pandey.mbox
Logging in securely via SSL as poojagverma on Fri Mar 27 22:29:50 2009
Failed: Invalid ID or password entered (username: pooja33pandey )

If you are running Vista, you might see this infamous pop-up window, which you will need to unblock:
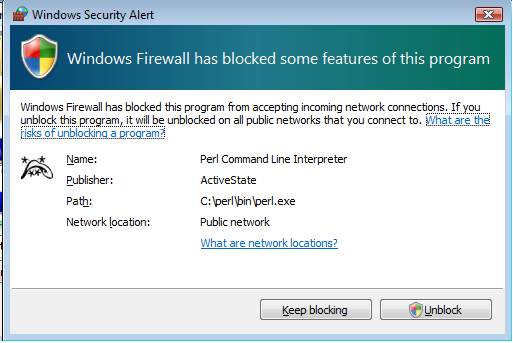
vista-perl-block-dialog

All right! So it works. Now, lets try a more comprehensive example:
c:\emails\fetchyahoo-2.13.3>perl fetchyahoo --onlylistmessages --username=pooja1
3pandey --password=<pwd> --spoolfile=pooja.mbox --logout
Use of uninitialized value $ENV{"HOME"} in concatenation (.) or string at fetchy
ahoo line 1992.
Logging in securely via SSL as pooja13pandey on Fri Mar 27 22:45:49 2009
Country Code 'in' not found. We will try the translation for 'us'.
Country code : in FetchYahoo! Version: 2.13.3
Successfully logged in as pooja13pandey.
Marking messages read on the server

Fetching mail from folder: Inbox
Getting Message ID(s) for message(s) 1 - 25.
1. new "Public Records " - Locate anyone. Search public records. 7:46 AM 6KB
2. new "Pooja Pandey <p" - online skype number (678) 534-2725 2:47 AM 3KB
3. old "Nimesh Bhuva <b" - Re: [GHPCSB_MCA_2k] Re: Happy Holi 27/3/09 35KB
4. old "Nimesh Bhuva <b" - Re: [GHPCSB_MCA_2k] Happy Holi 27/3/09 32KB
5. old "Birthday Remind" - First Reminder for Vibha Deshmukh's Birthday 26/3/09
4KB
6. old "Sharma, Ashish " - RE: [LIKELY JUNK]RE: [LIKELY JUNK]Re: So it 25/3/09 6
0KB
....
....
Got 90 Message IDs
Not downloading messages
Messages have not been deleted.
Logged out.

Note that fetchyahoo limits the messages fetched to 90 by default, because there is a download limit of 65mb per hour per user per IP address that is set by yahoo. You can use --safedownload option to give a gap of 5-10 seconds between each message fetch. This way, you can run a single command for a long time, without hitting the yahoo imposed download limit (per user, per IP).

Note that once you download the messages locally, they will be marked as read. If you want to terminate the download in between, you can do so and resume it later with the --newonly and --msgidarchivefile option. By defeault, the messages are appended to the archive/spool file:
D:\emails\fetchyahoo-2.13.3>perl fetchyahoo --folder=<foldername>  \
--username=<username> --password=<password> \
--safedownload  --spoolfile=<foldername>.mbox \
--msgidarchivefile=<foldername>_msgids  --newonly

Conclusion: The strategy in a nutshell


So there you have it. A simple mechanism to get targeted email ids for making your online marketing campaign successful:

1) Identify the Yahoo Group that you are interested in. This is a strategic decision. You want to limit your focus to people who would be interested in your idea. The demographics are important for high return on interest.

2) Become a member of the group and subscribe to individual emails.

3) Setup a filter to direct all Group emails to a specific folder. Free Yahoo account allows for 100 such filters now. Make sure the traffic is flowing in.

4) Sit on your ass for 6 months to 1 year to allow of significant volume of emails. If it is high activity/volume group, then your wait time would be lesser.

5) Fetch the Yahoo folder contents to your local PC. Now you are sitting on the goldmine.

6) Filter out the email ids using simple shell script provided here. Feel free to extent it to your needs. Always manually check the email ids retrieved.

7) Last, but not the least, input the contacts gathered to your mail broadcast software and reap the benefits by inviting them to your newsletter/broadcast.

Remember, the golden rule of thumb to retain the interest of your audience -- Do not send too many similar mails in too short a period of time. Start very moderately and hope that most of them would join your newsletter.

Conclusion - With great power comes great responsbility..


Well, I hope that this article was helpful to you, if your intentions are true and pure. I DO NOT support mis-use of this method for spamming people's inboxes and for immoral or lucrative purposes (that is NOT the intention with which this article has been written).

If you find this article useful or would like to discuss it further, please leave a comment here. Have a great day and Good luck.

Monday, April 21, 2008

Combining Openfiler and Virtualbox (Ubuntu guest OS on windows host)

Preface - Celebrating Openfiler


Ever since I came to know about openfiler, a free open source network attached storage appliance, I could not wait to get started on it! Compared to similar open source products in the internet like FreeNAS, openfiler has much better reviews from the user community.

In this article, we will talk about how we can leverage openfiler along with an Ubuntu virtual machine running on windows host. The fact that the virtual machine is running on windows is immaterial, as most of the material covered in this article will deal with making openfiler shared devices work with a unix distribution, namely Ubuntu, in our case. The steps discussed should not be largely different for any other unix operating system.

The ingredients


One of the main ingredients for doing this setup is to know about how to make host only networking work in Virtualbox. For this, I will recommend you to go through the article Virtualbox Case Study: Making host only networking work between two Ubuntu Guest OS (virtual machine) on Windows Vista host, that was posted just before this one. It has detailed steps as to how two virtual machines can be made to talk to each other, with internet working too.


So, going along with this idea, you need to do host only networking between a Unix virtual machine and an openfiler installation virtual machine. For installing openfiler, detailed how to graphical instructions are available at http://openfiler.com/learn/how-to/graphical-installation. If you are a text person, consider going through the text instructions at http://openfiler.com/learn/how-to/text-based-installation.

The other important ingredient that we need is an external USB hard disk to attach with the openfiler virtual machine like this:

click here for a bigger picture


I discovered that after the openfiler virtual machine booted up, windows vista premium home edition was not able to discover the USB hard disk in explorer. After I shutdown openfiler virtual machine, windows would detect the USB external drive.

windows-discovers-the-usb-drive


I also noticed was that if I specified the USB mouse device in the virtualbox USB devices setup of the unix machine, it was not able to access it! (The touchpad was still working though). So eventually, I just unchecked the USB mouse device for Ubuntu virtual machine and everything was ok.

The Openfiler Virtualbox VM setup example

Click here to see a bigger picture


The Ubuntu unix Virtualbox VM setup example

Click here to see a bigger picture


After the openfiler installation, you can see that it installs a linux 2.6.x OS, which can be brought up like any other linux installation.


Once you boot up the operating system, you can invoke the web administration GUI tool using http://<IP of openfiler server>:446 like this (openfiler/password is the default login):

Click here for a bigger picture


A Caveat if you do not want to use the entire external USB drive as network attached storage


Since I could not afford to dedicate my entire 300GB USB external drive for this experiment, I had to find a way of working with a part of it. Thankfully, with the help of gparted live CD, I was able to resize the FAT32/NTFS windows partition in external drive to 175G and created another partition of 125G with the remaining space. If you have never used gparted (GNOME partition editor), I must tell you that you simply have to try it. It is free, its versatile and its simply amazing.
Please note here that I DID NOT format the 125G partition as ext3 or any other format. This was important since the openfiler was not able to see the second physical volume in the USB drive otherwise as a iSCSI device otherwise.

Once this was done, I found that the openfiler administrator GUI was having a hard time creating a physical volume and a volume group based on the second partition carved in USB drive.
It seems that the GUI assumes that the entire attached drive should be available for its manipulations.

To get around this problem, I had to use the command line interface commands, which was good in a way, as I was able to learn many useful commands that are employed by the pretty front end. Using fdisk -l, it could be seen that the USB external drive was discovered as /dev/sda by openfiler OS.
# pvcreate /dev/sda2
Physical volume "/dev/sda2" successfully created

Click here for the bigger picture


Let it be understood that after any changes on openfiler, it is required to restart the iSCSI service. This can be done either by "# service iscsi-target restart" command or from the GUI: Services->Enable/Disable (Disable and Enable the iSCSI service forcibly to achieve the same result).

# vgcreate openfiler /dev/sda2
Volume group "vg" successfully created

Click here for a bigger picture (note that the Web UI
does not show the PVs yet, but its still OK)


After this, we need to create the logical volumes. Another weird thing I noticed was that if I used the lvcreate commane line interface to create logical volumes, they were not showing up in the web admin utility, even after restarting the iSCSI server on openfiler OS.

So I created three of them from the web administration utility (Hey, whatever works):

/dev/openfiler/ocr
/dev/openfiler/vote
/dev/openfiler/asm

This is how the web GUI showed them now:

Click here for a bigger view


The openfiler:/etc/ietd.conf file now has contents like this:


Defining Local networks


Be informed that another variation here is to define a local network consisting of IP subnet, which would essentially decide which machines can be allowed to discover the LUNs in network attached storage. Using the GUI, this is achieved through General->Local Networks.


Subsequently, you need can control allow/deny access to each logical volume from the GUI by updating the property of respective logical volumes (be aware that this creates /etc/initiators.allow and /etc/initiators.deny files in the openfiler OS):

Click here for a bigger view


I did not use any local networks, as I got burnt by giving an incorrect subnet and that was causing the discovery of LUNs to not work from ubuntu VM. So I just kept it plain and simple by allowing any machine in the LAN to discover the LUNs.

CHAP authentication


There is also something called CHAP authentication (the username and passwords can be set using the iscsiadm command) to further qualify iscsi initiator/target LUN discovery. This is a topic that I have not explored fully at this point, so I did not enable incoming/outgoing CHAP authentication either in openfiler OS (iSCSI target) or the ubuntu virtual machine (iSCSI initiator).


This was another aspect of open-iscsi that burnt me while trying to discover target LUNs from ubuntu VM, so I just steered clear of it, for the time being.


There is a fantastic How to on how to configure open-iscsi using CHAP authentication at http://en.opensuse.org/Open-iSCSI_and_SUSE_Linux. I would strongly recommend you to read and digest it.


Understanding how LUN discovery works with open-iscsi


open-iscsi is a robust, well performing implementation of iSCSI device package that is very much in vogue and is being adopted by various unix flavours.

It runs a daemon in the background called iscsid. Open-iSCSI utility keeps a persistent configuration of target LUNs and initiator nodes in a database. The iscsiadm utility is a command-line tool to manage (update, delete, insert, query) the persistent database.

The database contains two tables:

- Discovery table (/etc/iscsi/send_targets);
- Node table (/etc/iscsi/nodes).

You can install the open-iscsi package using either Synaptic package manager or "sudo apt-get install open-iscsi" command in Ubuntu. For my case, the apt-get command was somehow not able to to refer to ubuntu repositories, but thankfully Synaptic package manager worked fine.

open-iscsi works on a client server model. Initiators like the Ubuntu virtual machine will send discovery requests to SCSI targets and access them by creating login sessions. Till the duration of the session, the initiator can access the discovered targets (LUNs). Simply put, that is it.

This can be made a little complicated by adding CHAP authentication into the mix.

Each Initiator has a unique name, which can be got by checking the contents of /etc/iscsi/initiatorname.iscsi:
gverma@gverma-laptop:~$ sudo more /etc/iscsi/initiatorname.iscsi
## DO NOT EDIT OR REMOVE THIS FILE!
## If you remove this file, the iSCSI daemon will not start.
## If you change the InitiatorName, existing access control lists
## may reject this initiator. The InitiatorName must be unique
## for each iSCSI initiator. Do NOT duplicate iSCSI InitiatorNames.
InitiatorName=iqn.1993-08.org.debian:01:8211251a31ff


Making iscsi work


After installation of open-iscsi, I made sure that /etc/iscsi/iscsid.conf had the defaults configured, without CHAP authentication. The defaults for the rest are usually ok, which is what I went along with. After any changes, its important to restart open-iscsi service:

# sudo /etc/init.d/open-iscsi restart

I also disabled CHAP authentication (both incoming and outgoing users) for each logical volume from the openfiler GUI administrator utility.
The IP of openfiler VM was 192.168.0.6 and that Ubuntu VM was 192.168.0.4

Some initial problems..


gverma@gverma-laptop:~$ sudo iscsiadm -m discovery -t
st -p 192.168.0.6
iscsiadm: Login failed to authenticate with target

iscsiadm: discovery login to 192.168.0.6 rejected:
initiator error (02/01), non-retryable, giving up

To debug this, we can use the -d switch:
gverma@gverma-laptop:~$ sudo iscsiadm -m discovery -d -t st -p 192.168.0.6

discovery.startup = manual
discovery.type = sendtargets
discovery.sendtargets.address = 192.168.0.6
discovery.sendtargets.port = 3260
discovery.sendtargets.auth.authmethod = None
discovery.sendtargets.auth.username = gverma
discovery.sendtargets.auth.password = ********

discovery.sendtargets.auth.username_in = <empty>
discovery.sendtargets.auth.password_in = <empty>

discovery.sendtargets.timeo.login_timeout = 15
discovery.sendtargets.reopen_max = 5
discovery.sendtargets.timeo.auth_timeout = 45
discovery.sendtargets.timeo.active_timeout = 30
discovery.sendtargets.timeo.idle_timeout = 60
discovery.sendtargets.iscsi.MaxRecvDataSegmentLength = 32768

It seemed that some sort of authentication was still being used. To overcome this issue, I commented CHAP authentication for all discovery modes in /etc/iscsi/iscsid.conf and restarted open-iscsi service.

Then we needed to discover the targets on 192.168.0.6 (openfiler VM):
gverma@gverma-laptop:~$ sudo iscsiadm -m discovery
-t st -p 192.168.0.6
192.168.0.6:3260,1 iqn.2006-01.com.openfiler:openfiler.asm
192.168.0.6:3260,1 iqn.2006-01.com.openfiler:openfiler.ocr
192.168.0.6:3260,1 iqn.2006-01.com.openfiler:openfiler.vote

gverma@gverma-laptop:~$ sudo iscsiadm -m discovery
192.168.0.6:3260 via sendtargets

gverma@gverma-laptop:~$ sudo iscsiadm -m node
192.168.0.6:3260,1 iqn.2006-01.com.openfiler:openfiler.ocr
192.168.0.6:3260,1 iqn.2006-01.com.openfiler:openfiler.vote
192.168.0.6:3260,1 iqn.2006-01.com.openfiler:openfiler.asm

Now that the targets from Ubuntu node were discovered, it was needed to login to each of them:
gverma@gverma-laptop:~$ sudo iscsiadm -m node
-T iqn.2006-01.com.openfiler:openfiler.ocr -p 192.168.0.6 -l

Login session [iface: default, target: iqn.2006-01.com.openfiler:openfiler.ocr,
portal: 192.168.0.6,3260]

iscsiadm: initiator reported error (5 - encountered iSCSI login failure)
iscsiadm: Could not execute operation on all records. Err 107.

This error was because I had setup a local network for qualifying initiators to connect to LUNs and has basically given a wrong subnet in the openfiler setup. When I removed the local network from openfiler setup, removed openfiler:/etc/initiators.allow and /etc/initiators.deny files, and restarted ietd service, the command went through.

Now, we can also setup the target LUNs to startup/attach automatically on iscsi service restart on initiator (this will make the LUNs visible from the iscsi initiator by creating a session to the iscsi target). This can be done by influencing the node.startup property value to automatic in the iscsid database:
gverma@gverma-laptop:~$ sudo iscsiadm -m node \
-T iqn.2006-01.com.openfiler:openfiler.ocr -p 192.168.0.6 \
--op update -n node.startup -v automatic
gverma@gverma-laptop:~$ sudo iscsiadm -m node \
-T iqn.2006-01.com.openfiler:openfiler.vote -p 192.168.0.6 \
--op update -n node.startup -v automatic
gverma@gverma-laptop:~$ sudo iscsiadm -m node \
-T iqn.2006-01.com.openfiler:openfiler.asm -p 192.168.0.6 \
--op update -n node.startup -v automatic

Now, when we restart the open-iscsi service, it can be seen that the targets LUNs are attaching to the initiator:
gverma@gverma-laptop:~$ sudo /etc/init.d/open-iscsi restart
* Disconnecting iSCSI targets [ OK ]
* Stopping iSCSI initiator service [ OK ]
* Starting iSCSI initiator service iscsid [ OK ]
* Setting up iSCSI targets
Login session [iface: default, target: iqn.2006-01.com.openfiler:openfiler.ocr,
portal: 192.168.0.6,3260]
Login session [iface: default, target: iqn.2006-01.com.openfiler:openfiler.vote,
portal: 192.168.0.6,3260]
Login session [iface: default, target: iqn.2006-01.com.openfiler:openfiler.asm,
portal: 192.168.0.6,3260] [ OK ]

You can verify the login sessions with this command:
gverma@gverma-laptop:~$ sudo iscsiadm -m session
tcp: [4] 192.168.0.6:3260,1 iqn.2006-01.com.openfiler:openfiler.ocr
tcp: [5] 192.168.0.6:3260,1 iqn.2006-01.com.openfiler:openfiler.vote
tcp: [6] 192.168.0.6:3260,1 iqn.2006-01.com.openfiler:openfiler.asm

If you logout, the sessions wont be visible anymore:
gverma@gverma-laptop:~$ sudo iscsiadm -m node \
-T iqn.2006-01.com.openfiler:openfiler.asm -p 192.168.0.6 --logout
Logout session [sid: 1, target: iqn.2006-01.com.openfiler:openfiler.ocr,
portal: 192.168.0.6,3260]
Logout session [sid: 2, target: iqn.2006-01.com.openfiler:openfiler.vote,
portal: 192.168.0.6,3260]
Logout session [sid: 3, target: iqn.2006-01.com.openfiler:openfiler.asm,
portal: 192.168.0.6,3260]
gverma@gverma-laptop:~$ sudo iscsiadm -m session
iscsiadm: No active sessions.

You can login back again now:
gverma@gverma-laptop:~$ sudo iscsiadm -m node \
-T iqn.2006-01.com.openfiler:openfiler.asm -p 192.168.0.6 --login
Login session [iface: default, target: iqn.2006-01.com.openfiler:openfiler.ocr,
portal: 192.168.0.6,3260]
Login session [iface: default, target: iqn.2006-01.com.openfiler:openfiler.vote,
portal: 192.168.0.6,3260]
Login session [iface: default, target: iqn.2006-01.com.openfiler:openfiler.asm,
portal: 192.168.0.6,3260]
gverma@gverma-laptop:~$ sudo iscsiadm -m session
tcp: [4] 192.168.0.6:3260,1 iqn.2006-01.com.openfiler:openfiler.ocr
tcp: [5] 192.168.0.6:3260,1 iqn.2006-01.com.openfiler:openfiler.vote
tcp: [6] 192.168.0.6:3260,1 iqn.2006-01.com.openfiler:openfiler.asm

This is how the current mapping of the attached SAN LUNs and device name is got for the current session:
gverma@gverma-laptop:~$ ls -l /dev/disk/by-path
lrwxrwxrwx 1 root root 9 2008-04-16 22:02 ..
ip-192.168.0.6:3260-iscsi-iqn.2006-01.com.openfiler:openfiler.asm-lun-0 -> ../../sdd

lrwxrwxrwx 1 root root 9 2008-04-16 22:02 ..
ip-192.168.0.6:3260-iscsi-iqn.2006-01.com.openfiler:openfiler.ocr-lun-0 -> ../../sdb
lrwxrwxrwx 1 root root 9 2008-04-16 22:02 ..
ip-192.168.0.6:3260-iscsi-iqn.2006-01.com.openfiler:openfiler.vote-lun-0 -> ../../sdc
lrwxrwxrwx 1 root root 9 2008-04-16 12:48 pci-0000:00:01.1-scsi-0:0:0:0 -> ../../sda
lrwxrwxrwx 1 root root 10 2008-04-16 12:48 pci-0000:00:01.1-scsi-0:0:0:0-part1 -> ../../sda1
lrwxrwxrwx 1 root root 10 2008-04-16 12:48 pci-0000:00:01.1-scsi-0:0:0:0-part2 -> ../../sda2
lrwxrwxrwx 1 root root 10 2008-04-16 12:48 pci-0000:00:01.1-scsi-0:0:0:0-part5 -> ../../sda5
lrwxrwxrwx 1 root root 10 2008-04-16 12:48 pci-0000:00:01.1-scsi-1:0:0:0 -> ../../scd0

Paydirt: Seeing the LUNs on Ubuntu VM


This could be seen in the /var/log/messages:


Apr 16 21:53:19 gverma-laptop kernel: [18263.996005] scsi 42:0:0:0: Direct-Access Openfile Virtual disk 0 PQ: 0 ANSI: 4
Apr 16 21:53:19 gverma-laptop kernel: [18264.000393] sd 42:0:0:0: [sdb] 2097152 512-byte hardware sectors (1074 MB)
Apr 16 21:53:19 gverma-laptop kernel: [18264.002548] sd 42:0:0:0: [sdb] Write Protect is off
Apr 16 21:53:19 gverma-laptop kernel: [18264.004196] sd 42:0:0:0: [sdb] Write cache: disabled, read cache: enabled, doesn't support DPO or FUA
Apr 16 21:53:19 gverma-laptop kernel: [18264.004196] sd 42:0:0:0: [sdb] 2097152 512-byte hardware sectors (1074 MB)
Apr 16 21:53:19 gverma-laptop kernel: [18264.004196] sd 42:0:0:0: [sdb] Write Protect is off
Apr 16 21:53:19 gverma-laptop kernel: [18264.009630] sd 42:0:0:0: [sdb] Write cache: disabled, read cache: enabled, doesn't support DPO or FUA
Apr 16 21:53:19 gverma-laptop kernel: [18264.009718] sdb: unknown partition table
Apr 16 21:53:19 gverma-laptop kernel: [18264.030856] sd 42:0:0:0: [sdb] Attached SCSI disk
Apr 16 21:53:19 gverma-laptop kernel: [18264.030974] sd 42:0:0:0: Attached scsi generic sg2 type 0
Apr 16 21:53:19 gverma-laptop kernel: [18264.292677] scsi43 : iSCSI Initiator over TCP/IP
Apr 16 21:53:19 gverma-laptop kernel: [18264.553516] scsi 43:0:0:0: Direct-Access Openfile Virtual disk 0 PQ: 0 ANSI: 4
Apr 16 21:53:19 gverma-laptop kernel: [18264.555463] sd 43:0:0:0: [sdc] 2097152 512-byte hardware sectors (1074 MB)
Apr 16 21:53:19 gverma-laptop kernel: [18264.556540] sd 43:0:0:0: [sdc] Write Protect is off
Apr 16 21:53:19 gverma-laptop kernel: [18264.559456] sd 43:0:0:0: [sdc] Write cache: disabled, read cache: enabled, doesn't support DPO or FUA
Apr 16 21:53:19 gverma-laptop kernel: [18264.561681] sd 43:0:0:0: [sdc] 2097152 512-byte hardware sectors (1074 MB)
Apr 16 21:53:19 gverma-laptop kernel: [18264.564112] sd 43:0:0:0: [sdc] Write Protect is off
Apr 16 21:53:19 gverma-laptop kernel: [18264.566617] sd 43:0:0:0: [sdc] Write cache: disabled, read cache: enabled, doesn't support DPO or FUA
Apr 16 21:53:19 gverma-laptop kernel: [18264.566719] sdc: unknown partition table
Apr 16 21:53:19 gverma-laptop kernel: [18264.585774] sd 43:0:0:0: [sdc] Attached SCSI disk
Apr 16 21:53:19 gverma-laptop kernel: [18264.585872] sd 43:0:0:0: Attached scsi generic sg3 type 0
Apr 16 21:53:20 gverma-laptop kernel: [18264.847763] scsi44 : iSCSI Initiator over TCP/IP
Apr 16 21:53:20 gverma-laptop kernel: [18265.112437] scsi 44:0:0:0: Direct-Access Openfile Virtual disk 0 PQ: 0 ANSI: 4
Apr 16 21:53:20 gverma-laptop kernel: [18265.112437] sd 44:0:0:0: [sdd] 125829120 512-byte hardware sectors (64425 MB)
Apr 16 21:53:20 gverma-laptop kernel: [18265.112437] sd 44:0:0:0: [sdd] Write Protect is off
Apr 16 21:53:20 gverma-laptop kernel: [18265.113012] sd 44:0:0:0: [sdd] Write cache: disabled, read cache: enabled, doesn't support DPO or FUA
Apr 16 21:53:20 gverma-laptop kernel: [18265.115823] sd 44:0:0:0: [sdd] 125829120 512-byte hardware sectors (64425 MB)
Apr 16 21:53:20 gverma-laptop kernel: [18265.117126] sd 44:0:0:0: [sdd] Write Protect is off
Apr 16 21:53:20 gverma-laptop kernel: [18265.119686] sd 44:0:0:0: [sdd] Write cache: disabled, read cache: enabled, doesn't support DPO or FUA
Apr 16 21:53:20 gverma-laptop kernel: [18265.119786] sdd: unknown partition table
Apr 16 21:53:20 gverma-laptop kernel: [18265.134147] sd 44:0:0:0: [sdd] Attached SCSI disk
Apr 16 21:53:20 gverma-laptop kernel: [18265.134235] sd 44:0:0:0: Attached scsi generic sg4 type 0

The SAN devices were visible on Ubuntu VM now:


gverma@gverma-laptop:~$ sudo fdisk -l
Disk /dev/sda: 5906 MB, 5906628608 bytes
255 heads, 63 sectors/track, 718 cylinders
Units = cylinders of 16065 * 512 = 8225280 bytes
Disk identifier: 0x000eb831
Device Boot Start End Blocks Id System
/dev/sda1 * 1 680 5462068+ 83 Linux
/dev/sda2 681 718 305235 5 Extended
/dev/sda5 681 718 305203+ 82 Linux swap / Solaris
Disk /dev/sdb: 1073 MB, 1073741824 bytes
34 heads, 61 sectors/track, 1011 cylinders
Units = cylinders of 2074 * 512 = 1061888 bytes
Disk identifier: 0x00000000
Disk /dev/sdb doesn't contain a valid partition table
Disk /dev/sdc: 1073 MB, 1073741824 bytes
34 heads, 61 sectors/track, 1011 cylinders
Units = cylinders of 2074 * 512 = 1061888 bytes
Disk identifier: 0x00000000
Disk /dev/sdc doesn't contain a valid partition table
Disk /dev/sdd: 64.4 GB, 64424509440 bytes
64 heads, 32 sectors/track, 61440 cylinders
Units = cylinders of 2048 * 512 = 1048576 bytes
Disk identifier: 0x00000000
Disk /dev/sdd doesn't contain a valid partition table

Gotcha: Logical Volumes lost after reboot of openfiler


One common caveat that I noticed was that the logical volumes were lost after a reboot of the openfiler virtual machine. The issue seems to be related to detection of USB devices while bringing up the linux OS.

Anyways, to get around it, I did the following each time (better put this in /etc/rc.local)
# pvscan
# vgscan
# lvscan

Activate the logical volumes, otherwise, although sudo /etc/init.d/open-iscsi restart will show that initiator discovers target LUNs, BUT they will not show up in fdisk -l and when you do lvdisplay on openfiler machine, the status will show as NOT available.

# lvchange -ay openfiler/asm
# lvchange -ay openfiler/ocr
# lvchange -ay openfiler/vote
# pvscan
# vgscan
# lvscan

You can verify the status of the logical/physical volumes and volume groups now:
# lvdisplay
# pvdisplay
# vgdisplay

Pending Areas to explore


  • One of the pending topics to explore is unique device labeling using udev. This will prevent LUN name renaming from /dev/sdb to /dev/sdd all of a sudden, should you happen to add a new Logical volume in the SAN or restart the open-iscsi server on initiator.


I tried setting it up using some other examples on the internet, but it did not quite work out. It also seems that devlabel is passe' and udev is favored in most unix distributions.


  • Mounting the SAN device as a filesystem on initiator machine.


Conclusion


Well, its not as if I covered the whole nine yards, but it was a start and I hope to complete the remaining topics soon. When I do so, I will cover that in more details either in this article or in a separate one.

In the meanwhile, if you have any feedback, feel free to leave a message or email me at gaurav _ verma 22 at yahoo DOT com.

Friday, April 18, 2008

Virtualbox Case Study: Making host only networking work between two Ubuntu Guest OS (virtual machine) on Windows Vista host

Preface


In the past articles, I have talked about how to make internal networking work between two virtual machines built using Virtualbox. In this article, we will see seeing a configuration of host only networking between two virtual machines built on virtualbox.

The advantages of configuring host only networking are :


1) Internet works (yes!)

2) You get an IP on the LAN for each virtual machine. Yes, this is really possible. So this means that you can have 2 more real LAN IPs coming out of a single windows desktop/laptop in the LAN. Isn't that amazing?

3) Due to 2), your host machine can also ping or access your virtual machine

4) Each virtual machine can access the other virtual machine. E.g. ping/ssh/telnet into it.

For most purposes, this kind of setup should be optimal or sufficient. Hey, if you can access your machines in the LAN and internet works from them, that should be good enough. And, its for free.

Here is a bird's eye overview of the end setup..


click here to enlarge this diagram


The Virtualbox Network Adapter configuration


We start with the Virtualbox Network Adapter configuration. We create a host only network interface on each virtual machine definition.

For Virtual machine1 - Gutsy:


For Virtual machine2 - gutsy2:


Please note here that while this article primarily deals with setting up host only networking, in the previous article, I had setup internal networking too, so these VMs also have a Virtual Host Interface 2 for internal networking within themselves.

Install the Guest Operating system on the virtual machines


Now, do the installation of the guest operating system in the virtual machine and setup the two network interfaces like this.
Note here that I chose static IP 192.168.0.5 because my windows machine (host OS) had the IP 192.168.0.3 and the IP had to be in the 192.168.0.x subnet. My windows host was behind a Netgear router.


We need to make sure we choose non-conflicting IPs for the host only interface otherwise you will get an IP conflict in your LAN domain. For the other machine, the eth0 static IP was 192.168.0.4.

An interesting fact here was that if I chose DHCP for eth0 in the VM, i was getting an IP of 192.168.0.3, the same as that of my windows host!! This is another reason why I had to choose static IP address.


For eth1, i chose a random IP in the subnet 192.168.2.x for no particular reason. The eth1 IP of the other virtual machine was 192.168.2.1


Make sure to restart the network after doing this network setup to bring it into effect.

Do not bother about the SIOCADDRT: No such process error:
gverma@gverma-laptop:~$ sudo /etc/init.d/networking restart
[sudo] password for gverma:
* Reconfiguring network interfaces...
SIOCADDRT: No such process
Failed to bring up eth1.
[ OK ]

For the benefit of the reader, the DNS and host information is also reproduced here, although the only thing of significance should be the DNS and default gateway, both of which were set to be the same as that on windows host:


This is how the network configuration on the other virtual machine looked like:


For those who are interested, here is the output of the route command:


gverma@gverma-laptop:~$ route
Kernel IP routing table
Destination Gateway Genmask Flags Metric Ref Use Iface
192.168.2.0 * 255.255.255.0 U 0 0 0 eth1
192.168.0.0 * 255.255.255.0 U 0 0 0 eth0
link-local * 255.255.0.0 U 1000 0 0 eth0
default 192.168.0.1 0.0.0.0 UG 100 0 0 eth0

A quick side note for Windows Vista


Here is a quick side note for Vista or windows in general. It is preferable to disable the UAC (user access control) setting and also disable the firewall on the host windows machine.


Disable the User Access Control (UAC) feature on vista to make your life easier:


Network bridging: the key to make host only networking work


The KEY to make host only networking work on windows is to bridge the real working network interface (either wireless connection of a hard wired ethernet) with the virtual adapter network interface. You can do this by selecting two network interfaces, right click, choose bridge and voila, there you have it.
A network bridge is nothing but a simplified concept of joining two connections into one. Its like joining two rivers into a bigger river. When water will flow into the bigger river, it will flow into both the rivers. At least, this is how I understand it.

ALSO, we have to enable promiscuous packet routing mode in ALL the member network interfaces that are in the bridge. This is an important setup to make it work.


Initially, I had struggled a lot to make host only networking work by enabling promiscuous for only the Virtualbox Adapter in the bridge, but was not successful. That is when I read a cryptic posting on the Virtualbox forum saying that it has to be done for all the member bridge interfaces; and thats when it worked.


A note of caution


When we add an adapter to the bridge, the connection of the main wireless network is lost for a moment, but it is re-enabled back. This is also covered in the user manual in secion 6.3 (Virtualbox version 1.5.6)


Warning: Setting up Host Interface Networking requires changes to your
host’s network configuration, which will cause the host to lose its network
connection.
Do not change network settings on remote or production systems
unless you know what you are doing.


Later on, I assigned Virtualbox Host Interface 2 (on windows) to NAT0 (eth0) of Virtual machine 2 and bridged it to the wireless network connection too:


After the bridging, this is how the ipconfig output looked like (the IP of the windows host is 192.168.0.3):


ipconfig-output-there-is-a-new-ip-in-the-lan-now


Now, we were one BIG, HAPPY Family. Make sure the connection status shows as connected.


Testing the connections - Internet works!


At this point, the internet was working from the virtual machines:


Another real quick check is to use the wget utility:


gverma@gverma-laptop:~$ wget yahoo.com
--18:32:56-- http://yahoo.com/
=> `index.html'
Resolving yahoo.com... 216.109.112.135, 66.94.234.13
Connecting to yahoo.com|216.109.112.135|:80... connected.
HTTP request sent, awaiting response... 301 Moved Permanently
Location: http://www.yahoo.com/ [following]
--18:32:57-- http://www.yahoo.com/
=> `index.html'
Resolving www.yahoo.com... 69.147.114.210
Connecting to www.yahoo.com|69.147.114.210|:80... connected.
HTTP request sent, awaiting response... 200 OK
Length: 9,490 (9.3K) [text/html]

100%[=====================================================>] 9,490 --.--K/s

18:32:57 (258.06 KB/s) - `index.html' saved [9490/9490]

Testing the connections - Host only networking


Now comes the acid test of whether the virtual machines and hosts can see each other.

Windows could see the individual virtual machines:
C:\Users\gaurav> ping 192.168.0.4
Pinging 192.168.0.4 with 32 bytes of data:

Reply from 192.168.0.4: bytes=32 time<1ms TTL=64

Ping statistics for 192.168.0.4:
Packets: Sent = 4, Received = 4, Lost = 0 (0% loss),
Approximate round trip times in milli-seconds:
Minimum = 0ms, Maximum = 0ms, Average = 0ms

C:\Users\gaurav> ping 192.168.0.5
Pinging 192.168.0.5 with 32 bytes of data:

Reply from 192.168.0.5: bytes=32 time<1ms TTL=128

Ping statistics for 192.168.0.5:
Packets: Sent = 4, Received = 4, Lost = 0 (0% loss),
Approximate round trip times in milli-seconds:
Minimum = 0ms, Maximum = 0ms, Average = 0ms

Pinging the windows host IP from inside the VMs worked beautifully:


And, pinging to the other virtual machine from each VM worked beautifully too:

ping-vm1-and-vm2-from-a-vm

Taking this a step further, since ssh was enabled on both the virtual machines, I was able to login to the individual virtual machines also:
gverma@gverma-laptop:~$ ps -ef | grep ssh
gverma 4684 4643 0 21:27 ? 00:00:00 /usr/bin/ssh-agent x-session-manager
root 5422 1 0 22:20 ? 00:00:00 /usr/sbin/sshd
gverma 5456 4864 0 22:23 pts/0 00:00:00 grep ssh
gverma@gverma-desktop:~$ ssh 192.168.0.5

gverma@192.168.0.5's password:
Linux gverma-desktop 2.6.22-14-generic #1 SMP Sun Oct 14 23:05:12 GMT 2007 i686

The programs included with the Ubuntu system are free software;
the exact distribution terms for each program are described in the
individual files in /usr/share/doc/*/copyright.

Ubuntu comes with ABSOLUTELY NO WARRANTY, to the extent permitted by
applicable law.
Last login: Mon Apr 14 22:20:55 2008 from gverma-laptop.local
gverma@gverma-desktop:~$

gverma@gverma-desktop:~$ ssh 192.168.0.4
The authenticity of host '192.168.0.4 (192.168.0.4)' can't be established.
RSA key fingerprint is a8:29:91:97:7d:99:37:6e:31:f1:06:ec:04:39:78:d7.
Are you sure you want to continue connecting (yes/no)? yes
Warning: Permanently added '192.168.0.4' (RSA) to the list of known hosts.

gverma@192.168.0.4's password:

Linux gverma-laptop 2.6.22-14-generic #1 SMP Sun Oct 14 23:05:12 GMT 2007 i686

The programs included with the Ubuntu system are free software;
the exact distribution terms for each program are described in the
individual files in /usr/share/doc/*/copyright.
Ubuntu comes with ABSOLUTELY NO WARRANTY, to the extent permitted by
applicable law.

Private networks


To make things better, the private networks were working too (thanks to the good karma accumulated in the previous article - Case study: Configuring Internal networking work for talking two linux guest OS (Ubuntu) on windows vista host ) :
gverma@gverma-laptop:~$ ping 192.168.2.1
PING 192.168.2.1 (192.168.2.1) 56(84) bytes of data.
64 bytes from 192.168.2.1: icmp_seq=1 ttl=64 time=0.200 ms
64 bytes from 192.168.2.1: icmp_seq=2 ttl=64 time=1.16 ms
64 bytes from 192.168.2.1: icmp_seq=3 ttl=64 time=0.000 ms
64 bytes from 192.168.2.1: icmp_seq=4 ttl=64 time=0.073 ms
--- 192.168.2.1 ping statistics ---
4 packets transmitted, 4 received, 0% packet loss, time 3006ms
rtt min/avg/max/mdev = 0.000/0.358/1.160/0.468 ms

gverma@gverma-laptop:~$ ping 192.168.2.2
PING 192.168.2.2 (192.168.2.2) 56(84) bytes of data.
64 bytes from 192.168.2.2: icmp_seq=1 ttl=64 time=4.49 ms
64 bytes from 192.168.2.2: icmp_seq=2 ttl=64 time=0.368 ms
64 bytes from 192.168.2.2: icmp_seq=3 ttl=64 time=1.65 ms
64 bytes from 192.168.2.2: icmp_seq=4 ttl=64 time=3.15 ms
64 bytes from 192.168.2.2: icmp_seq=5 ttl=64 time=1.51 ms

A moment of Triumph


So here we are. Let us take a moment to sit back, relax and let reality sink it. It is really working! I am reminded of the umpteen times I had gone to forums.virtualbox.org to find the answer to this riddle and here it is, solved.

I hope this guide is of use to someone else who is trying to make a similar configuration work or just trying to understand -- what is it that we can achieve from host only networking??

Nothing could be sweeter, nothing.

Sunday, April 13, 2008

Case study: Making Internal networking for talking between two linux guest OS (Ubuntu) on windows vista host

Preface


For the past few days, I had been struggling with making internal networking work on two (or more) linux guest OSes on Windows host using virtualbox.

The advantage of this setup is we can setup an internal networking lab between two or more nods using regular windows, which can be used for a variety of purposes. My primary purpose behind this setup was to simulate an environment for implementing Oracle 10gR2 RAC cluster.

As we know, setting up 10g RAC on a node needs a public network and a private network. The public network is achieved right off the bat with the NAT network configuration in Virtualbox, but the internal network setup is one that is pretty tricky.
I will give credit to both http://www.virtualbox.org/wiki/Testing_Networks and http://blogs.sun.com/manoj/entry/netowkring_with_virtualbox for the ideas tested, but more so to http://www.virtualbox.org/wiki/Testing_Networks

That being said, I would daresay that the content authoring in Virtualbox user manual about setting up internal networking on windows host deserves a little more attention. I was able to find several posts on the internet, including a particular Virtualbox wiki page, that dealt with making host only networking or internal networking work on Ubuntu host, but was not able to find the same for windows host.

Lets get to the setup now..


This is how the GUI setup looks like internal network (Adapter 1 - 2nd adapter) for the two virtual machines:


The caveat...


The first thing which we need to understand that is the Virtualbox GUI for setting up internal network is BROKEN!

You need to set it up using the command line interface (VboxManage command) Also, be aware that the internal network settings are reset by the GUI if any of the VM settings are changed, so you better do this AFTER you are done with all the other VM changes.

As per the User manual, the default internal network name is "intnet", but you can choose any other name. I chose the intnet for no particular reason.

This is what we need to do with the VboxManage command. (here, we assume that there are two guest OSes - "Gutsy" and "gutsy2"). Mind you, the virtual machine name is case-sensitive in the VboxManage command.

c:\Program Files\Innotek> VboxManage modifyvm Gutsy -nic2 intnet

c:\Program Files\Innotek> VboxManage modifyvm Gutsy -intnet2 intnet

c:\Program Files\Innotek> VboxManage modifyvm gutsy2 -nic2 intnet

c:\Program Files\Innotek> VboxManage modifyvm gutsy2 -intnet2 intnet


Default Gateway and DNS of eth1 interfaces - (used for private network as per our semantics)


If you already have the eth0 in the guest OS (linux) as NAT, it will automatically acquire a DHCP assigned IP in the subnet 10.0.2.x, and will have a default gateway of 10.0.2.2. The names server will be 10.0.2.3. With this setup, internet will work on the linux guest OS, (provided it is works on the windows host too).


We will need to make the default gateway of the private network (eth1) in guest OS (linux) as 10.0.2.2 too -- whichever is causing the internet to work.

Private IPs should be the same subnet...


Another thing to notice here is that all the guest OSes that are intended to be connected through internal network should have the private interface IP (eth1) in the SAME subnet. You can choose any private subnet like 192.168.x.x or 10.10.x.x:

Here are three valid combinations of eth1 IPs:

a) Gutsy could have 192.168.2.1, and gutsy2 could have 192.168.2.2


b) Gutsy could have 192.168.3.2, and gutsy2 could have 192.168.3.4


c) Gutsy could have 10.10.1.1, and gutsy2 could have 10.10.1.2


( I hope you get the idea).

For the sake of illustration, I chose this combination of private IPs:

  • 192.168.2.1 (for linux guest OS 1 - Gutsy)

  • 192.168.2.2 (for linux guest OS 1 - gutsy2)


Restart networking


After doing this, you need to restart the networking on the linux host. On Ubuntu, it is done with the sudo /etc/init.d/networking restart command:
gverma@gverma-desktop:~$ sudo /etc/init.d/networking restart
[sudo] password for gverma: ********
* Reconfiguring network interfaces...
SIOCADDRT: No such process
Failed to bring up eth1.
[ OK ]

Overview of the networking configuration


Here is how the ifconfig for Gutsy - linux guest OS 1 looks like (as you can see the eth0 IP has been acquired in 10.0.2.x subnet by the DHCP server):


And this is how it looks of Gutsy2 (as you can see, the eth0 IP has been acquired in 10.0.2.x subnet by the DHCP server):
By mistake, I have put the same image for the ifconfig output (that of Gutsy) for Gutsy2  as well. The hardware MAC address for eth1/0 should be different and so should be the the IP address for eth1 -- it should be 192.168.2.1. The eth0 IP for Gutsy2 would still be 10.0.2.x as it was of NAT type. -- Thanks, Gaurav


A variation...


Let us consider a variation here.

If the Virtual machines have only 1 virtualbox network adapter defined of type internal network, then the internal static IP within the Virtual machine would have needed to use a default gateway == host's IP default gateway.

For example, if the windows host had an IP of 192.168.0.4 (say), by virtue of being behind a router, then the default gateway of eth0 interface in in the virtual machine should be 192.168.0.1. (Again, this is assuming ONLY if you do not have a NAT type virtual interface defined for the VM.)


In my case, since I had two virtual network interfaces defined (one NAT and one internal networking type) for the VMs, I had to make the default gateway of the eth1 (private interface) of guest OS the same as that of eth0 -- which was 10.0.2.2.

The default gateway can be verified by the output of route command.


Interesting Trivia


In addition, the media state of the Virtual TAP Adapters in windows host were showing up as media disconnected, but still the internet was working for the Virtual machines AND the pings to each other were working. So, don't be fooled by the status of Virtulbox Adapters in the windows host.

gverma@gverma-desktop:~$ ping 192.168.2.1
PING 192.168.2.2 (192.168.2.2) 56(84) bytes of data.
64 bytes from 192.168.2.2: icmp_seq=1 ttl=64 time=0.031 ms
64 bytes from 192.168.2.2: icmp_seq=2 ttl=64 time=0.030 ms
64 bytes from 192.168.2.2: icmp_seq=3 ttl=64 time=0.109 ms
64 bytes from 192.168.2.2: icmp_seq=4 ttl=64 time=0.031 ms
64 bytes from 192.168.2.2: icmp_seq=5 ttl=64 time=0.036 ms
64 bytes from 192.168.2.2: icmp_seq=6 ttl=64 time=0.033 ms
64 bytes from 192.168.2.2: icmp_seq=7 ttl=64 time=0.110 ms

--- 192.168.2.2 ping statistics ---
7 packets transmitted, 7 received, 0% packet loss, time 5998ms
rtt min/avg/max/mdev = 0.030/0.054/0.110/0.035 ms

gverma@gverma-desktop:~$ ping 192.168.2.2
PING 192.168.2.1 (192.168.2.1) 56(84) bytes of data.
64 bytes from 192.168.2.1: icmp_seq=1 ttl=64 time=0.398 ms
64 bytes from 192.168.2.1: icmp_seq=2 ttl=64 time=0.304 ms
64 bytes from 192.168.2.1: icmp_seq=3 ttl=64 time=0.380 ms
64 bytes from 192.168.2.1: icmp_seq=4 ttl=64 time=7.20 ms
64 bytes from 192.168.2.1: icmp_seq=5 ttl=64 time=0.407 ms
64 bytes from 192.168.2.1: icmp_seq=6 ttl=64 time=0.272 ms
64 bytes from 192.168.2.1: icmp_seq=7 ttl=64 time=3.42 ms
64 bytes from 192.168.2.1: icmp_seq=8 ttl=64 time=0.411 ms
64 bytes from 192.168.2.1: icmp_seq=9 ttl=64 time=0.398 ms

--- 192.168.2.1 ping statistics ---
9 packets transmitted, 9 received, 0% packet loss, time 8004ms
rtt min/avg/max/mdev = 0.272/1.465/7.200/2.241 ms

Viola! The same result can be seen on gutsy2 too.

Well done!


Congratulations on setting up a private internal network between multiple virtual machines using Virtualbox. I hope this tutorial is of use to someone exploring the virtualbox tool. I personally feel it is a lot leaner and powerful, as compared to the vmware's size. It is also more robust performance wise.

If you feel this was helpful, send me a note at gaurav_verma two two [at] yahoo dot com or just leave me a comment.