Preface - Celebrating Openfiler
Ever since I came to know about
openfiler, a free open source network attached storage appliance, I could not wait to get started on it! Compared to similar open source products in the internet like
FreeNAS, openfiler has much better reviews from the user community.
In this article, we will talk about how we can leverage openfiler along with an Ubuntu virtual machine running on windows host. The fact that the virtual machine is running on windows is immaterial, as most of the material covered in this article will deal with making openfiler shared devices work with a unix distribution, namely Ubuntu, in our case. The steps discussed should not be largely different for any other unix operating system.
The ingredients
One of the main ingredients for doing this setup is to know about how to make host only networking work in
Virtualbox. For this, I will recommend you to go through the article
Virtualbox Case Study: Making host only networking work between two Ubuntu Guest OS (virtual machine) on Windows Vista host, that was posted just before this one. It has detailed steps as to how two virtual machines can be made to talk to each other, with internet working too.
So, going along with this idea, you need to do host only networking between a Unix virtual machine and an openfiler installation virtual machine. For installing openfiler, detailed how to graphical instructions are available at
http://openfiler.com/learn/how-to/graphical-installation. If you are a text person, consider going through the text instructions at
http://openfiler.com/learn/how-to/text-based-installation.
The other important ingredient that we need is an external USB hard disk to attach with the openfiler virtual machine like this:
click here for a bigger picture
I discovered that after the openfiler virtual machine booted up, windows vista premium home edition was not able to discover the USB hard disk in explorer. After I shutdown openfiler virtual machine, windows would detect the USB external drive.

I also noticed was that if I specified the USB mouse device in the virtualbox USB devices setup of the unix machine, it was not able to access it! (The touchpad was still working though). So eventually, I just unchecked the USB mouse device for Ubuntu virtual machine and everything was ok.
The Openfiler Virtualbox VM setup exampleClick here to see a bigger picture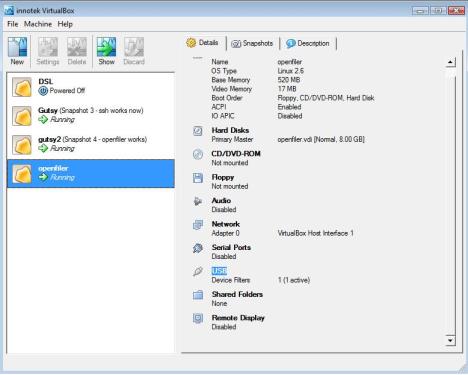 The Ubuntu unix Virtualbox VM setup exampleClick here to see a bigger picture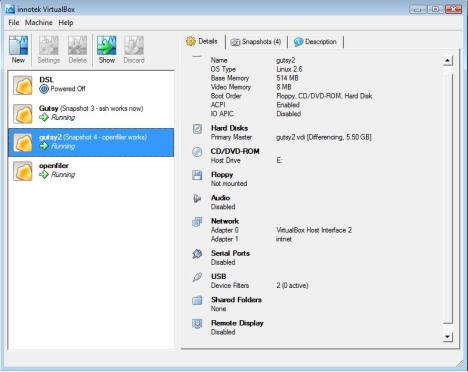
After the openfiler installation, you can see that it installs a linux 2.6.x OS, which can be brought up like any other linux installation.
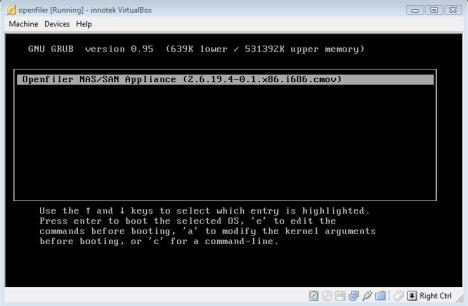
Once you boot up the operating system, you can invoke the web administration GUI tool using http://<IP of openfiler server>:446 like this (openfiler/password is the default login):
Click here for a bigger picture
A Caveat if you do not want to use the entire external USB drive as network attached storage
Since I could not afford to dedicate my entire 300GB USB external drive for this experiment, I had to find a way of working with a part of it. Thankfully, with the help of
gparted live CD, I was able to resize the FAT32/NTFS windows partition in external drive to 175G and created another partition of 125G with the remaining space. If you have never used gparted (GNOME partition editor), I must tell you that you simply have to try it. It is free, its versatile and its simply amazing.
Please note here that I DID NOT format the 125G partition as ext3 or any other format. This was important since the openfiler was not able to see the second physical volume in the USB drive otherwise as a iSCSI device otherwise.
Once this was done, I found that the openfiler administrator GUI was having a hard time creating a physical volume and a volume group based on the second partition carved in USB drive.
It seems that the GUI assumes that the entire attached drive should be available for its manipulations.
To get around this problem, I had to use the command line interface commands, which was good in a way, as I was able to learn many useful commands that are employed by the pretty front end. Using fdisk -l, it could be seen that the USB external drive was discovered as /dev/sda by openfiler OS.
# pvcreate /dev/sda2
Physical volume "/dev/sda2" successfully created
Click here for the bigger picture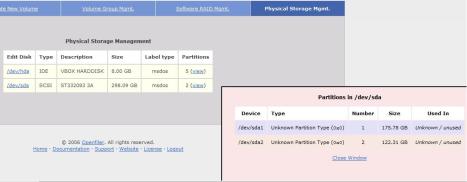
Let it be understood that after any changes on openfiler, it is required to restart the iSCSI service. This can be done either by "# service iscsi-target restart" command or from the GUI: Services->Enable/Disable (Disable and Enable the iSCSI service forcibly to achieve the same result).
# vgcreate openfiler /dev/sda2
Volume group "vg" successfully created

Click here for a bigger picture (note that the Web UI
does not show the PVs yet, but its still OK)

After this, we need to create the logical volumes. Another weird thing I noticed was that if I used the lvcreate commane line interface to create logical volumes, they were not showing up in the web admin utility, even after restarting the iSCSI server on openfiler OS.
So I created three of them from the web administration utility (Hey, whatever works):
/dev/openfiler/ocr
/dev/openfiler/vote
/dev/openfiler/asm
This is how the web GUI showed them now:
Click here for a bigger view
The openfiler:/etc/ietd.conf file now has contents like this:

Defining Local networks
Be informed that another variation here is to define a local network consisting of IP subnet, which would essentially decide which machines can be allowed to discover the LUNs in network attached storage. Using the GUI, this is achieved through
General->Local Networks.

Subsequently, you need can control allow/deny access to each logical volume from the GUI by updating the property of respective logical volumes (be aware that this creates
/etc/initiators.allow and
/etc/initiators.deny files in the openfiler OS):
Click here for a bigger view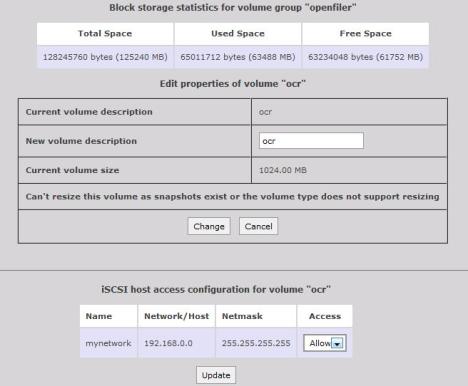
I did not use any local networks, as I got burnt by giving an incorrect subnet and that was causing the discovery of LUNs to not work from ubuntu VM. So I just kept it plain and simple by allowing any machine in the LAN to discover the LUNs.
CHAP authentication
There is also something called CHAP authentication (the username and passwords can be set using the iscsiadm command) to further qualify iscsi initiator/target LUN discovery. This is a topic that I have not explored fully at this point, so I did not enable incoming/outgoing CHAP authentication either in openfiler OS (iSCSI target) or the ubuntu virtual machine (iSCSI initiator).
This was another aspect of open-iscsi that burnt me while trying to discover target LUNs from ubuntu VM, so I just steered clear of it, for the time being.
There is a fantastic How to on how to configure open-iscsi using CHAP authentication at http://en.opensuse.org/Open-iSCSI_and_SUSE_Linux. I would strongly recommend you to read and digest it.
Understanding how LUN discovery works with open-iscsi
open-iscsi is a robust, well performing implementation of iSCSI device package that is very much in vogue and is being adopted by various unix flavours.
It runs a daemon in the background called
iscsid. Open-iSCSI utility keeps a persistent configuration of target LUNs and initiator nodes in a database. The
iscsiadm utility is a command-line tool to manage (update, delete, insert, query) the persistent database.
The database contains two tables:
- Discovery table (/etc/iscsi/send_targets);
- Node table (/etc/iscsi/nodes).
You can install the open-iscsi package using either
Synaptic package manager or "sudo apt-get install open-iscsi" command in Ubuntu. For my case, the apt-get command was somehow not able to to refer to ubuntu repositories, but thankfully
Synaptic package manager worked fine.
open-iscsi works on a client server model. Initiators like the Ubuntu virtual machine will send discovery requests to SCSI targets and access them by creating login sessions. Till the duration of the session, the initiator can access the discovered targets (LUNs). Simply put, that is it.
This can be made a little complicated by adding CHAP authentication into the mix.
Each Initiator has a unique name, which can be got by checking the contents of /etc/iscsi/initiatorname.iscsi:
gverma@gverma-laptop:~$ sudo more /etc/iscsi/initiatorname.iscsi
## DO NOT EDIT OR REMOVE THIS FILE!
## If you remove this file, the iSCSI daemon will not start.
## If you change the InitiatorName, existing access control lists
## may reject this initiator.  The InitiatorName must be unique
## for each iSCSI initiator.  Do NOT duplicate iSCSI InitiatorNames.
InitiatorName=iqn.1993-08.org.debian:01:8211251a31ff
Making iscsi work
After installation of open-iscsi, I made sure that /etc/iscsi/iscsid.conf had the defaults configured, without CHAP authentication. The defaults for the rest are usually ok, which is what I went along with. After any changes, its important to restart open-iscsi service:
# sudo /etc/init.d/open-iscsi restart
I also disabled CHAP authentication (both incoming and outgoing users) for each logical volume from the openfiler GUI administrator utility.
The IP of openfiler VM was 192.168.0.6 and that Ubuntu VM was 192.168.0.4
Some initial problems..
gverma@gverma-laptop:~$ sudo iscsiadm -m discovery -t
st -p 192.168.0.6
iscsiadm: Login failed to authenticate with target
iscsiadm: discovery login to 192.168.0.6 rejected:
initiator error (02/01), non-retryable, giving up
To debug this, we can use the
-d switch:gverma@gverma-laptop:~$ sudo iscsiadm -m discovery -d -t st -p 192.168.0.6
discovery.startup = manual
discovery.type = sendtargets
discovery.sendtargets.address = 192.168.0.6
discovery.sendtargets.port = 3260
discovery.sendtargets.auth.authmethod = Nonediscovery.sendtargets.auth.username = gverma
discovery.sendtargets.auth.password = ********discovery.sendtargets.auth.username_in = <empty>
discovery.sendtargets.auth.password_in = <empty>discovery.sendtargets.timeo.login_timeout = 15
discovery.sendtargets.reopen_max = 5
discovery.sendtargets.timeo.auth_timeout = 45
discovery.sendtargets.timeo.active_timeout = 30
discovery.sendtargets.timeo.idle_timeout = 60
discovery.sendtargets.iscsi.MaxRecvDataSegmentLength = 32768
It seemed that some sort of authentication was still being used. To overcome this issue, I commented CHAP authentication for all discovery modes in /etc/iscsi/iscsid.conf and restarted open-iscsi service.
Then we needed to discover the targets on 192.168.0.6 (openfiler VM):
gverma@gverma-laptop:~$ sudo iscsiadm -m discovery
-t st -p 192.168.0.6
192.168.0.6:3260,1 iqn.2006-01.com.openfiler:openfiler.asm
192.168.0.6:3260,1 iqn.2006-01.com.openfiler:openfiler.ocr
192.168.0.6:3260,1 iqn.2006-01.com.openfiler:openfiler.vote
gverma@gverma-laptop:~$ sudo iscsiadm -m discovery
192.168.0.6:3260 via sendtargets
gverma@gverma-laptop:~$ sudo iscsiadm -m node
192.168.0.6:3260,1 iqn.2006-01.com.openfiler:openfiler.ocr
192.168.0.6:3260,1 iqn.2006-01.com.openfiler:openfiler.vote
192.168.0.6:3260,1 iqn.2006-01.com.openfiler:openfiler.asm
Now that the targets from Ubuntu node were discovered, it was needed to login to each of them:
gverma@gverma-laptop:~$ sudo iscsiadm -m node
-T iqn.2006-01.com.openfiler:openfiler.ocr -p 192.168.0.6 -l
Login session [iface: default, target: iqn.2006-01.com.openfiler:openfiler.ocr,
portal: 192.168.0.6,3260]
iscsiadm: initiator reported error (5 - encountered iSCSI login failure)
iscsiadm: Could not execute operation on all records. Err 107.
This error was because I had setup a local network for qualifying initiators to connect to LUNs and has basically given a wrong subnet in the openfiler setup. When I removed the local network from openfiler setup, removed openfiler:/etc/initiators.allow and /etc/initiators.deny files, and restarted ietd service, the command went through.
Now, we can also setup the target LUNs to startup/attach automatically on iscsi service restart on initiator (this will make the LUNs visible from the iscsi initiator by creating a session to the iscsi target). This can be done by influencing the node.startup property value to automatic in the iscsid database:
gverma@gverma-laptop:~$ sudo iscsiadm -m node \
-T iqn.2006-01.com.openfiler:openfiler.ocr -p 192.168.0.6 \
--op update -n node.startup -v automatic
gverma@gverma-laptop:~$ sudo iscsiadm -m node \
-T iqn.2006-01.com.openfiler:openfiler.vote -p 192.168.0.6 \
--op update -n node.startup -v automatic
gverma@gverma-laptop:~$ sudo iscsiadm -m node \
-T iqn.2006-01.com.openfiler:openfiler.asm -p 192.168.0.6 \
--op update -n node.startup -v automatic
Now, when we restart the open-iscsi service, it can be seen that the targets LUNs are attaching to the initiator:
gverma@gverma-laptop:~$ sudo /etc/init.d/open-iscsi restart
* Disconnecting iSCSI targets                                                                                         [ OK ]
* Stopping iSCSI initiator service                                                                                    [ OK ]
* Starting iSCSI initiator service iscsid                                                                             [ OK ]
* Setting up iSCSI targets
Login session [iface: default, target: iqn.2006-01.com.openfiler:openfiler.ocr,
portal: 192.168.0.6,3260]
Login session [iface: default, target: iqn.2006-01.com.openfiler:openfiler.vote,
portal: 192.168.0.6,3260]
Login session [iface: default, target: iqn.2006-01.com.openfiler:openfiler.asm,
portal: 192.168.0.6,3260]                                                                                               [ OK ]
You can verify the login sessions with this command:
gverma@gverma-laptop:~$ sudo iscsiadm -m session
tcp: [4] 192.168.0.6:3260,1 iqn.2006-01.com.openfiler:openfiler.ocr
tcp: [5] 192.168.0.6:3260,1 iqn.2006-01.com.openfiler:openfiler.vote
tcp: [6] 192.168.0.6:3260,1 iqn.2006-01.com.openfiler:openfiler.asm
If you logout, the sessions wont be visible anymore:
gverma@gverma-laptop:~$ sudo iscsiadm -m node \
-T iqn.2006-01.com.openfiler:openfiler.asm -p 192.168.0.6 --logout
Logout session [sid: 1, target: iqn.2006-01.com.openfiler:openfiler.ocr,
portal: 192.168.0.6,3260]
Logout session [sid: 2, target: iqn.2006-01.com.openfiler:openfiler.vote,
portal: 192.168.0.6,3260]
Logout session [sid: 3, target: iqn.2006-01.com.openfiler:openfiler.asm,
portal: 192.168.0.6,3260]
gverma@gverma-laptop:~$ sudo iscsiadm -m session
iscsiadm: No active sessions.
You can login back again now:
gverma@gverma-laptop:~$ sudo iscsiadm -m node \
-T iqn.2006-01.com.openfiler:openfiler.asm -p 192.168.0.6 --login
Login session [iface: default, target: iqn.2006-01.com.openfiler:openfiler.ocr,
portal: 192.168.0.6,3260]
Login session [iface: default, target: iqn.2006-01.com.openfiler:openfiler.vote,
portal: 192.168.0.6,3260]
Login session [iface: default, target: iqn.2006-01.com.openfiler:openfiler.asm,
portal: 192.168.0.6,3260]
gverma@gverma-laptop:~$ sudo iscsiadm -m session
tcp: [4] 192.168.0.6:3260,1 iqn.2006-01.com.openfiler:openfiler.ocr
tcp: [5] 192.168.0.6:3260,1 iqn.2006-01.com.openfiler:openfiler.vote
tcp: [6] 192.168.0.6:3260,1 iqn.2006-01.com.openfiler:openfiler.asm
This is how the current mapping of the attached SAN LUNs and device name is got for the current session:
gverma@gverma-laptop:~$ ls -l /dev/disk/by-path
lrwxrwxrwx 1 root root  9 2008-04-16 22:02 ..
ip-192.168.0.6:3260-iscsi-iqn.2006-01.com.openfiler:openfiler.asm-lun-0 -> ../../sdd
lrwxrwxrwx 1 root root  9 2008-04-16 22:02 ..
ip-192.168.0.6:3260-iscsi-iqn.2006-01.com.openfiler:openfiler.ocr-lun-0 -> ../../sdb
lrwxrwxrwx 1 root root  9 2008-04-16 22:02 ..
ip-192.168.0.6:3260-iscsi-iqn.2006-01.com.openfiler:openfiler.vote-lun-0 -> ../../sdc
lrwxrwxrwx 1 root root  9 2008-04-16 12:48 pci-0000:00:01.1-scsi-0:0:0:0 -> ../../sda
lrwxrwxrwx 1 root root 10 2008-04-16 12:48 pci-0000:00:01.1-scsi-0:0:0:0-part1 -> ../../sda1
lrwxrwxrwx 1 root root 10 2008-04-16 12:48 pci-0000:00:01.1-scsi-0:0:0:0-part2 -> ../../sda2
lrwxrwxrwx 1 root root 10 2008-04-16 12:48 pci-0000:00:01.1-scsi-0:0:0:0-part5 -> ../../sda5
lrwxrwxrwx 1 root root 10 2008-04-16 12:48 pci-0000:00:01.1-scsi-1:0:0:0 -> ../../scd0
Paydirt: Seeing the LUNs on Ubuntu VM
This could be seen in the /var/log/messages:
Apr 16 21:53:19 gverma-laptop kernel: [18263.996005] scsi 42:0:0:0: Direct-Access Openfile Virtual disk 0 PQ: 0 ANSI: 4
Apr 16 21:53:19 gverma-laptop kernel: [18264.000393] sd 42:0:0:0: [sdb] 2097152 512-byte hardware sectors (1074 MB)
Apr 16 21:53:19 gverma-laptop kernel: [18264.002548] sd 42:0:0:0: [sdb] Write Protect is off
Apr 16 21:53:19 gverma-laptop kernel: [18264.004196] sd 42:0:0:0: [sdb] Write cache: disabled, read cache: enabled, doesn't support DPO or FUA
Apr 16 21:53:19 gverma-laptop kernel: [18264.004196] sd 42:0:0:0: [sdb] 2097152 512-byte hardware sectors (1074 MB)
Apr 16 21:53:19 gverma-laptop kernel: [18264.004196] sd 42:0:0:0: [sdb] Write Protect is off
Apr 16 21:53:19 gverma-laptop kernel: [18264.009630] sd 42:0:0:0: [sdb] Write cache: disabled, read cache: enabled, doesn't support DPO or FUA
Apr 16 21:53:19 gverma-laptop kernel: [18264.009718] sdb: unknown partition table
Apr 16 21:53:19 gverma-laptop kernel: [18264.030856] sd 42:0:0:0: [sdb] Attached SCSI disk
Apr 16 21:53:19 gverma-laptop kernel: [18264.030974] sd 42:0:0:0: Attached scsi generic sg2 type 0
Apr 16 21:53:19 gverma-laptop kernel: [18264.292677] scsi43 : iSCSI Initiator over TCP/IP
Apr 16 21:53:19 gverma-laptop kernel: [18264.553516] scsi 43:0:0:0: Direct-Access Openfile Virtual disk 0 PQ: 0 ANSI: 4
Apr 16 21:53:19 gverma-laptop kernel: [18264.555463] sd 43:0:0:0: [sdc] 2097152 512-byte hardware sectors (1074 MB)
Apr 16 21:53:19 gverma-laptop kernel: [18264.556540] sd 43:0:0:0: [sdc] Write Protect is off
Apr 16 21:53:19 gverma-laptop kernel: [18264.559456] sd 43:0:0:0: [sdc] Write cache: disabled, read cache: enabled, doesn't support DPO or FUA
Apr 16 21:53:19 gverma-laptop kernel: [18264.561681] sd 43:0:0:0: [sdc] 2097152 512-byte hardware sectors (1074 MB)
Apr 16 21:53:19 gverma-laptop kernel: [18264.564112] sd 43:0:0:0: [sdc] Write Protect is off
Apr 16 21:53:19 gverma-laptop kernel: [18264.566617] sd 43:0:0:0: [sdc] Write cache: disabled, read cache: enabled, doesn't support DPO or FUA
Apr 16 21:53:19 gverma-laptop kernel: [18264.566719] sdc: unknown partition table
Apr 16 21:53:19 gverma-laptop kernel: [18264.585774] sd 43:0:0:0: [sdc] Attached SCSI disk
Apr 16 21:53:19 gverma-laptop kernel: [18264.585872] sd 43:0:0:0: Attached scsi generic sg3 type 0
Apr 16 21:53:20 gverma-laptop kernel: [18264.847763] scsi44 : iSCSI Initiator over TCP/IP
Apr 16 21:53:20 gverma-laptop kernel: [18265.112437] scsi 44:0:0:0: Direct-Access Openfile Virtual disk 0 PQ: 0 ANSI: 4
Apr 16 21:53:20 gverma-laptop kernel: [18265.112437] sd 44:0:0:0: [sdd] 125829120 512-byte hardware sectors (64425 MB)
Apr 16 21:53:20 gverma-laptop kernel: [18265.112437] sd 44:0:0:0: [sdd] Write Protect is off
Apr 16 21:53:20 gverma-laptop kernel: [18265.113012] sd 44:0:0:0: [sdd] Write cache: disabled, read cache: enabled, doesn't support DPO or FUA
Apr 16 21:53:20 gverma-laptop kernel: [18265.115823] sd 44:0:0:0: [sdd] 125829120 512-byte hardware sectors (64425 MB)
Apr 16 21:53:20 gverma-laptop kernel: [18265.117126] sd 44:0:0:0: [sdd] Write Protect is off
Apr 16 21:53:20 gverma-laptop kernel: [18265.119686] sd 44:0:0:0: [sdd] Write cache: disabled, read cache: enabled, doesn't support DPO or FUA
Apr 16 21:53:20 gverma-laptop kernel: [18265.119786] sdd: unknown partition table
Apr 16 21:53:20 gverma-laptop kernel: [18265.134147] sd 44:0:0:0: [sdd] Attached SCSI disk
Apr 16 21:53:20 gverma-laptop kernel: [18265.134235] sd 44:0:0:0: Attached scsi generic sg4 type 0
The SAN devices were visible on Ubuntu VM now:
gverma@gverma-laptop:~$ sudo fdisk -l
Disk /dev/sda: 5906 MB, 5906628608 bytes
255 heads, 63 sectors/track, 718 cylinders
Units = cylinders of 16065 * 512 = 8225280 bytes
Disk identifier: 0x000eb831
Device Boot      Start         End      Blocks   Id  System
/dev/sda1   *           1         680     5462068+  83  Linux
/dev/sda2             681         718      305235    5  Extended
/dev/sda5             681         718      305203+  82  Linux swap / Solaris
Disk /dev/sdb: 1073 MB, 1073741824 bytes
34 heads, 61 sectors/track, 1011 cylinders
Units = cylinders of 2074 * 512 = 1061888 bytes
Disk identifier: 0x00000000
Disk /dev/sdb doesn't contain a valid partition table
Disk /dev/sdc: 1073 MB, 1073741824 bytes
34 heads, 61 sectors/track, 1011 cylinders
Units = cylinders of 2074 * 512 = 1061888 bytes
Disk identifier: 0x00000000
Disk /dev/sdc doesn't contain a valid partition table
Disk /dev/sdd: 64.4 GB, 64424509440 bytes
64 heads, 32 sectors/track, 61440 cylinders
Units = cylinders of 2048 * 512 = 1048576 bytes
Disk identifier: 0x00000000
Disk /dev/sdd doesn't contain a valid partition table
Gotcha: Logical Volumes lost after reboot of openfiler
One common caveat that I noticed was that the logical volumes were lost after a reboot of the openfiler virtual machine. The issue seems to be related to detection of USB devices while bringing up the linux OS.
Anyways, to get around it, I did the following each time (better put this in /etc/rc.local)
# pvscan
# vgscan
# lvscan
Activate the logical volumes, otherwise, although sudo /etc/init.d/open-iscsi restart will show that initiator discovers target LUNs, BUT they will not show up in fdisk -l and when you do lvdisplay on openfiler machine, the status will show as NOT available.
# lvchange -ay openfiler/asm
# lvchange -ay openfiler/ocr
# lvchange -ay openfiler/vote
# pvscan
# vgscan
# lvscan
You can verify the status of the logical/physical volumes and volume groups now:
# lvdisplay
# pvdisplay
# vgdisplay
Pending Areas to explore
- One of the pending topics to explore is unique device labeling using udev. This will prevent LUN name renaming from /dev/sdb to /dev/sdd all of a sudden, should you happen to add a new Logical volume in the SAN or restart the open-iscsi server on initiator.
I tried setting it up using some other examples on the internet, but it did not quite work out. It also seems that devlabel is passe' and udev is favored in most unix distributions.
- Mounting the SAN device as a filesystem on initiator machine.
Conclusion
Well, its not as if I covered the whole nine yards, but it was a start and I hope to complete the remaining topics soon. When I do so, I will cover that in more details either in this article or in a separate one.
In the meanwhile, if you have any feedback, feel free to leave a message or email me at gaurav _ verma 22 at yahoo DOT com.


